Showing posts with label recipe. Show all posts

Monday, February 23, 2015

Chicken Hugs

My apologies, it has been quite a while. You can catch up on my cross-country move, change in professions, puppy adoption and travels here.


Right now, I've got a creation that was inspired by mean post-workout hunger and very little time. We used 3 chicken breasts, a cup of cheese, 6 slices of ham (you could use any sliced deli meat) and 4 slices of bacon. It made 4 entrees, we each had two and we were very full after!

I'm not sure what to call this; "Chicken Hugs" comes to mind or "Reverse Chicken Cordon-Bleu" (I realise it is a different). Regardless here is what you need to do to make this meaty treat for yourself.

1. Cook yourself up some chicken. I blackened mine a little with some chili pepper spices and hot chipotle salt, but if you want to go a more Italian route you can season with garlic powder and traditional Italian spices.
On a separate ban half cook a piece of bacon for each entree you plan on making. Remove when half cooked.
2. Let your chicken cool after cooking and then rip it up into strips. I was able to use an entire small chicken breast in one of my entrees but it was tiny.
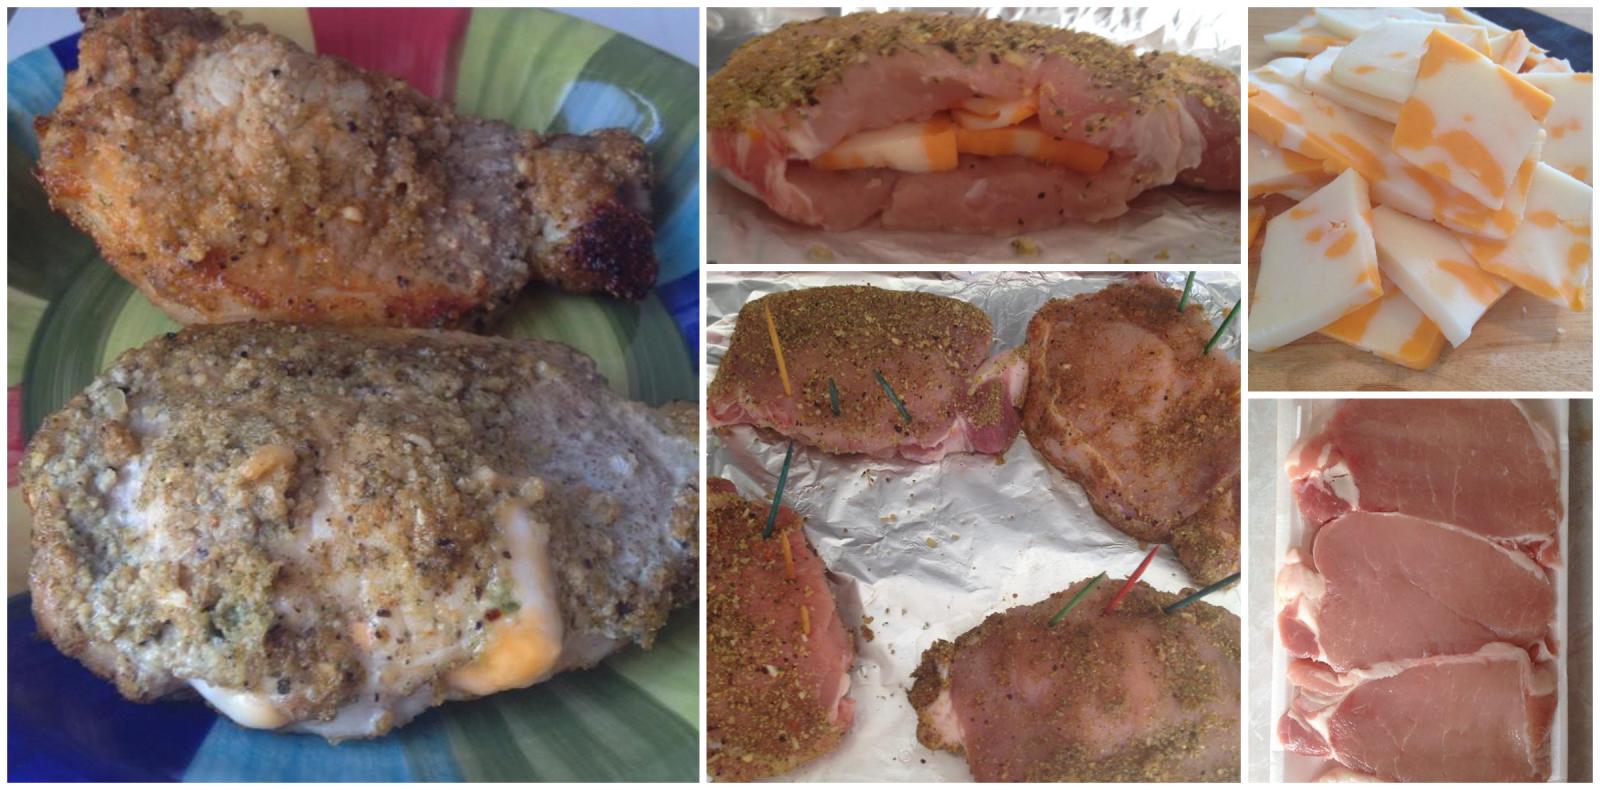
3. Lay out an entire piece of sliced ham on a baking sheet.
4. Lay down a bed of shredded cheese.
5. Lay down a layer of chicken with an inch or so to spare on each side to allow the ham to wrap over top.
6. Sprinkle more cheese on top of the chicken.
7. Wrap the layer of ham over the top of the chicken. As you can see for some of mine I double wrapped using two pieces of ham. Stick a toothpick through all the layers to hold it together.
8. Wrap your half cooked bacon around the ham with the ends coming together at the top.
9. Sprinkle more cheese on top.
10. Place pan in oven and allow to cook until the bacon is crisp and the cheese has melted.
11. Remove from heat and enjoy!


Bam, there you go! My unnamed chicken creation! To simplify the process we stuck out bacon I our George Foreman grill for a quick half cook and used chicken breasts we already had made. We had plenty chicken left over from the 3 breasts to make a salad as well!


Sunday, August 4, 2013

Cheese Stuffed Pork Chops

Pork chops and pork tenderloin are a staple in our diet. They are a cheap alternative to chicken and beef. We are poor new grads so saving a few bucks on meals is huge, I imagine this would be a perfect meal for a family. For $7 we bought 5 pork chops.

Ingredients
-Pork chops (I used 5)
-2 tsp of Mrs. Dash Garlic and Herb (you can also mix your own blend of herbs and garlic)
-a dash of salt and pepper
-1/2 tsp. of chili peppers
-coconut oil
-1 tsp. of hot sauce
-100-200g of your favourite cheese (we used marble)

The pork chops I used were rather thin, it was impossible to find thick cut chops at our grocer. If you can, use thick cut pork chops.

Procedure
1. Preheat oven to 350. And spread enough coconut oil over aluminum foil on pan for each pork chop.
2. Slice cheese into strips.
3. Make a length-wise slit in each pork chop that will fit your cheese. Do not cut down the entire length.
4. Stuff each pork chop with cheese.
5. Tooth pick the pork chop shut.
6. Add all of the dry ingredients together in a bowl.
7. Add hot sauce to the dry ingredients.
8. Dip each side of each pork chop in the spices in the bowl.
9. Bake the pork chops for 20 minutes.
10. Remove pork chops from oven and each one over. If cheese is leaking out you can try to put it back into the pork chops (or on top of them).
11. Bake for 10 to 15 minutes.

Nutritional Information
(to come)

Thursday, June 13, 2013

Pork Rind Breaded Chicken Bites

We made these amazing pork rind chicken bites on a night when we had run a little tired of our normal
grilled chicken breasts.

They are super easy and you can vary the recipe by using different sauces.

For this batch we used Guy's BBQ Sauce (0 carb) and cut it with hot sauce.

We wanted hot bites, if you are making 'salt and pepper' bite or garlic bites you may not want to spice the egge mixture with cayenne pepper and chili flakes.

Ingredients
1 Egg
1/2 Teaspoon of Cayenne Pepper
1/2 Teaspoon of Chili Flakes
2 Chicken Breasts
A Dash of Salt and Pepper
1/2 Bag of Pork Rinds
2 Tablespoons of Coconut Oil

Procedure
1. In a small bowl mix together salt, pepper, egg and spices.
2. In another small crush up half a bag of pork rinds for breading the chicken breasts.
3. Cut chicken breasts into bite sized portions or strips.
4. Heat one tablespoon of coconut oil at medium heat in pan.
5. Dip chicken in egg mixture.
6. Coat chicken with crushed pork rinds.
7. We make them in two batches, frying half the bites at a time. Fry for about five minutes. Flip and fry for an additional 2 minutes.
8. Plate the bites and then spoon sauce over the bites.


You may not want to use sauce at all for coating the chicken bites. You can alternatively just use a dipping sauce.

Nutritional Information 
(will be updated soon)

Monday, June 3, 2013

Beer Can Chicken

Beer can chicken is a favourite in my household.

Seriously, when all else fails there is 'Beer Can Chicken'.

The best park about it is how much it meat it makes, it is perfect for a supper for two or gour (depending on the size of your chicken) and you will most likely have left overs the put in your salad the next day.

We typically feed four adults with one beer can chicken and have enough leftovers to cut up for a salad the next day!

This recipe is pretty versatile too, you can spice the chicken to enhance different flavours. We use chicken rubs to spice it up a bit, but in this posting I will stick to the basics for a great low-carb/high-fibre 'Beer Can Chicken'.

We have started making this classic in our new smoker, but you can also make your 'Drunken Chicken' in the oven or on the barbecue. We prefer the barbecue, it is such a great summer dish!


Ingredients
1 Chicken (aim for a 4-5 pounder)
2 Tablespoons of liquified (heated) coconut oil
2 Tablespoons of salt
*3 Tablespoons of your favourite spices (I like a mixture of paprika, thyme, cayenne peppers, garlic powder, chillies and a dash of cinnamon) or use your favourite rub
1 Teaspoon of black pepper
1 Can of low carb beer (I use canned Michelob Ultra)

Procedure
1. Heat your BBQ to medium-high or your oven to 350F. If you are using gas try to use only half of your burners. If you are using coals that you move the chicken to an area free of coals.
2. Mix together your spices in a small bowl.
3. Remove and discard the chicken's neck and giblets.
4. Rinse the chicken inside and out.
5. Pat the chicken dry with paper towel, inside and outside.
6. Coat your chicken with coconut oil, inside and out.
7. Give your chicken a good rub with salt, your spices/rub and pepper. Again, both inside and out.
8. Empty half of your beer.
9. Insert your beer can into your chicken. This is easiest if you have one of the devices pictured below, but if you dont you can place your beer can on a counter and then thrust your chicken into it.
10. Place your bird in the center of your BBQ or oven and let cook for about 1 hour and 15 minutes. Keep your chicken away from direct heat.
11. Let sit for 5-10 minutes before serving.

Keep an eye on your chicken and make sure you test the temperature in the breast and thighs before serving.


You can buy the beer can chicken holder here:
http://www.kitchenniche.ca/beer-can-chicken-roaster-p-1061.html


Wednesday, April 24, 2013

Prosciutto Parm Chicken

Ingredients
-1/3 cup, graded parmesan cheese
-1/3 cup, herb and garlic cream cheese
-2 teaspoons, almond meal (use more for more breading)
-8 to 12 slices of prosciutto 

Procedure
1. Preheat oven to 425. 
2. Grease glass pan with coconut oil (or whatever you choose).
3. Soften cream cheese in microwave. 
4. Coat chicken with cream cheese.
5. Sprinkle one teaspoon of almond meal over each side of the chicken breasts.
6. Cook for 12 minutes.
7. Remove chicken from oven and sprinkle with the other teaspoon of almond meal. 
8. Cook for 12 more minutes. 
9. Remove chicken and sprinkle half of the parmesan cheese over chicken breasts and wrap the chicken with prosciutto. 
10. Sprinkle the rest of the parmesan cheese inside the prosciutto wrap and on top. 
11. Return the chicken to the oven for 5 minutes to crisp the prosciutto. 


Nutritional Information (per chicken breast):
*Will update
Calories: 310
Fat: 14.8g
Carbohydrates: 2g
Fibre: 0g
Sugars: 1.3g
Protein: 40g

I used two slices of prosciutto per chicken breast, but as you can see you could use a third to fully cover the chicken. I calculated the nutrition with ten slices, I only used eight.


Sunday, April 21, 2013

Prosciutto Wrapped Asparagus

This one is super easy!

Its a great appetizer or side for dinner parties and it also doubles as a quick greens fix when you are feeling overwhelmed by meat (even though this still includes meat). I never really liked asparagus until I tried it roasted in olive oil. It is as simple as cutting the asparagus out and just cooking the asparagus in the tablespoon in olive oil. If you are are on a budget, try switching the prosciutto out for normal deli ham.

And, for a little more flavour add parmesan cheese to the mix. Sprinkle grated parm over the cooked asparagus.

I recommend eating your delicious asparagus as soon as possible after removing the from the oven. Or, plating them for a second time afterwards so that the remaining olive oil will not make your asparagus soggy.


Below are the directions to make one serving (one prosciutto wrapped asparagus) for four people. You make as many servings as needed by increasing the asparagus spears and prosciutto at a three to one ratio.


Ingredients: 
- 12 asparagus spears
- 4 pieces of prosciutto
- 1 tablespoon of olive oil


Procedure: 
1. Pre-heat oven to 400F.
2. Trim asparagus.
3. Wrap three asparagus with one pieces of prosciutto. I like to cut the pieces of prosciutto in half, length wise and use the two halves to wrap the asparagus.
4. Coat each in olive oil.
5. Once the oven has pre-heated cook for 7 minutes.
6. Flip asparagus and cook for 4 minutes.

Nutritional Information (it makes 4 servings)
Calories: 70
Total Fat: 5.11g
Carbs: 1.8g
Fiber: 0.9g
Sugars: 0.6g
Protein: 5.1g


Tuesday, April 16, 2013

Low Carb Chili Con Carne

The first recipe here is the quick and easy recipe using a Club House packet of seasoning. I used the slow cooker and it took about 2 hours on low to get it to the consistency that I wanted.

It is very filling, but it is not completely homemade.

I love to add in leftover meats as well, chicken breast etc. And, I always put cheese on top of the chili (this is not included in the nutritional information).

I know the pictures are not very enticing. These were the best ones I could muster.


Ingredients
-100g of deli chicken (or use desired amount of chicken breast)
-1/2 Teaspoon of salt
-1 Packet of Club House 'Hot-n-Spicy Chili Mix'
-1 Can of Pizza Sauce (213 ml)
-1 Can of Kidney Beans (540 ml)
-3/4 LB of Cooked Ground Beef
-1/2 Teaspoon Garlic Powder
-1/8 Teaspoon Paprika
-3 Cups of Water
-1/2 Teaspoon Pepper
-2 Tablespoons of Hot Sauce

Procedure

1. Ensure all meats are cooked.
2. Add all ingredients to crock pot/slow cooker. Cook on low for around 2 hours*.


Nutritional Information (it makes 6 servings)
Calories: 281
Total Fat: 8.2g
Carbs: 19.7g
Fiber: 5.2g
Sugars: 2.2g
Protein: 30.5g


Here is the recipe for my homemade chili. Its an all day affair, I really like to leave it cooking for all the flavours to set in. There isn't much difference in calories but there are fewer carbs.

Ingredients
-1LB of Cooked Ground Beef
-100g of deli chicken (or use desired amount of chicken breast)
-3 Strips of Bacon
-1 Teaspoon of salt
-1 Can of Pizza Sauce (213 ml)
-1 1/4 Cup of Kidney Beans
-1 Tablespoon Garlic Powder
-2 Teaspoons Paprika
-5 Cups of Water
-1/2 Teaspoon Pepper
-2 Tablespoons of Hot Sauce
-1 Tablespoon Cumin
-2 Teaspoons Oregano
-4 Tablespoons of Tomatillo Salsa
-4 1/2 Cups of Water


Procedure
1. Ensure all meats are cooked.
2. Add all ingredients to crock pot/slow cooker and cook for around 8 hours on low* (cook until it is your desired consistency).


Nutritional Information (it makes 6 servings)
Calories: 278
Total Fat: 11.8g
Carbs: 13.5g
Fiber: 4.1g
Sugars: 1.6g
Protein: 28.2g


*From all of my experiences, slow cookers vary cook times. Make sure you keep an eye on it the first time you make it.


Wednesday, March 27, 2013

Keto Garlic Fingers

Pie pan keto garlic fingers.
Okay, another not so new recipe. But, a great variation of the low carb pizza recipe I posted previously.

If you are like me and from the east coast of Canada you know pizza is always better with garlic fingers. So I use half of my thick crust pizza recipe to make garlic fingers and half to make pizza. This fits perfectly in two pie pans.

So, whats so different? Well, not much. This actually has fewer carbs than the pizza. Instead of pizza sauce use garlic butter.

You can find garlic butter specifically at some grocery stores or you can make it (to taste) by mixing garlic and butter; then melting it in the microwave. I add Italian Seasoning or oregano as well.

Pie pan low-carb pizza. 
After spreading the butter mixture on the cooled crust add cheese (and bacon if you like) like a pizza.

Just a few changes to the pizza recipe and you have garlic fingers, a great side dish!

Here's the link to the crust recipe. Enjoy!


http://katesketo.blogspot.ca/2013/01/thick-keto-pizza-crust.html

Sunday, February 17, 2013

Low Carb Cookies & Cream Cake

Little, but mighty. 


I baked this cake the other day. I really, really liked it. It is small, but very filling. I baked mine in two layers, but you could make the mix in just one big cake. I really want to incorporate peanut butter with this cake in the future. I consider a slice of this cake a treat. It has about 7 carbs per slice and a ton of fat and protein. 


Side view


Ingredients
Cake
3 Cups of Almond Flour
3 Tablespoons of Sweetener
3 Tablespoons of Cocoa Powder
2 Teaspoons of Baking Powder
1/4 Teaspoon of Salt
5 Eggs
2 Teaspoons of Vanilla

Icing
1/4 Cup of Melted Butter
5 Oz of Cream Cheese
1/4 Cup of Whipping Cream
1 Teaspoon Coconut Oil
2 Teaspoons of Vanilla
1/4 Teaspoon of Cinnamon 
2 Tablespoons of Sweetener
3 Tablespoons of Cocoa Powder
1/4 Bar of 99% Cocoa Chocolate (I use Lindtt)

Prep Work
-Preheat oven to 350.
-Grease cake pan. 


Procedure
1. Mix the dry ingredients: Almond Flour, 3 Tablespoons of Sweetener, 3 Tablespoons of Cocoa Powder, baking powder and salt. 
2. Whisk eggs and 2 teaspoons of vanilla in a separate bowl. 
3. Add eggs mixture to the dry ingredients. 
4. Pour into greased pan (or pans).
5. My small oven baked the cake in 30 minutes. Keep an eye on it, this will vary (of course) by oven.

Make the icing while the cake bakes. 

6. Warm (but do not completely melt) cream cheese and butter together. Mix well. 
7. Add in teaspoon of coconut oil.
8. Add in 3 tablespoons of coca powder and 2 tablespoons of sweetener.
9. Add cinnamon and refridgerate. 
10. Allow cake to cool.
11. Ice cake and shave 99% cocoa chocolate over the cake. 

Inside.


Nutritonal Information (per slice, 8 slices per cake):
Calories: 460
Total Fat: 38.3g
Carbs: 13.3g
Fiber: 6.1g
Sugars: 3g
Protein: 15.2g


Wednesday, January 23, 2013

Keto/Low Carb Éclair

I had a really bad craving for eclairs and so I thought I would give making them a shot. Here is my first attempt at the recipe. I experimented with a few different ways to make them, the following is the recipe for my best of the batch. 

Overall,  I really liked them. I used home made low-carb vanilla pudding and used it for the inner cream, next time I am going to use low-carb pre made  pudding. You don't need too much pudding, maybe half a pack made from a mix. My homemade pudding (found in a separate blog post) was not think enough and leaked through the bottom. I froze them to avoid leakage. This recipe should make 12, mine are a little bigger than they should be. 

Ingredients 
1/2 Cup Butter (I used salted, if you do not use salted add 1/4 teaspoon of salt)
1 Cup Water
1 1/2 Cup Almond Flour
1/2 Tablespoon Of Cornstarch
4 Eggs
2 Cups Of Vanilla Pudding
3/4 Cup Heavy Cream
1/4 Cup Granulated Sweetener
3 Teaspoons Vanilla Extract
5 Squared Of 90% Cocoa Chocolate
2 Tablespoons Butter
1/3 Cup Sweetener
3 Tablespoons Of Hot Water

Prep Work
-Preheat oven to 400 degrees. 
-Grease a cookie sheet.

Procedure
-Combine 1/2 cup of butter and 1 cup of water in a medium saucepan. Bring to a boil, melt butter completely.
-Reduce to medium heat. Stir in almond flour, 1 teaspoon of vanilla and cornstarch. After a few minutes of brisk stirring reduce heat to low and let thicken. Remove from heat.
-Add eggs, one at a time. Mix completely.
-Put batter on cookie sheet in 1 1/2 x 4 inch strips. 
-Bake 10 minutes.
-Add more batter on the semi-firm top of each strip. Attempt to double it in size. 
-Reduce heat to 325 and bake for 15 to 20 more minutes. 
-Check on them, you want them to puff up and balloon. They will not end up being completely hollow on the inside.
-Cool on a wire rack.

For the filling:
-Beat the whip cream until soft peaks form. 
-Beat in 1/4 cup of sweetener and 1 teaspoon of vanilla.
-Fold whip cream into pudding. 

-Cut the tops off of the pastries once they have cooled.
-Spoon in filling and cover. Chill or freeze.

For icing:
-Melt chocolate and 2 tablespoons of butter in saucepan in low heat.
-Stir in 1/3 cup of sweetener and 1 teaspoon of vanilla. 
-Add water, one tablespoon at a time. 

-Drizzle or smooth icing over chilled pastries. I liked to seal the top back on with the chocolate icing. I then put mine in the freezer to make sure they stuck together. 

Nutrition (per eclair)
Calories: 315
Total Fat: 30g
Carbs: 6.6g
Fiber: 1.9g
Sugars: 1.1g
Protein: 6.2g